CSS
HTML can be styled via CSS. An HTML-element is selected via CSS selectors. Styles/rules are defined per selector block. Each definition is terminated by a ;. A rules block is enclosed by {, }.
<selector> {
    <property> : <value>;
    <property> : <value> <value>;
}
More info on the CSS syntax at w3schools
Include style information
Elements can be styled via three methods:
- style-attribute (discouraged)
- a style tag in the head (less discouraged)
- an external stylesheet (encouraged)
Style attribute
Use this method to quickly test some rule. Not as a permanent style. This way of managing styles is discouraged because it is a less maintainable way of styling web-pages. For example: styles can not be shared by elements…
Style tag
The style-tag that should be defined in the head of the document. The styles defined in this tag apply to the complete page.
<!DOCTYPE html>
<html lang="en">
<head>
    <meta charset="UTF-8">
    <title>My pae title</title>

    <style type="text/css">
        .selector {

            property: value;
        }
    </style>

</head>
<body>
    <!-- the body -->
</body>
</html>
Even though the styles are defined only once, elements can share them via selectors ( tag-name, classes, …)
External style sheet
The CSS-rules can also be defined in a dedicated CSS-file. This file can be included in a web-page via the link-tag
The rules defined in the file can be included in as many HTML-pages as you want. This makes it the most scalable method of defining and including CSS-rules.
<!DOCTYPE html>
<html lang="en">
<head>
    <meta charset="UTF-8">
    <title>My pae title</title>

    <link rel="stylesheet" type="text/css" href="style.css">

</head>
<body>
    <!-- the body -->
</body>
</html>CSS selectors
In order to apply rules to a certain element, the element must be targeted, selected.
CSS has the notion of selectors to target elements.
Tag-name
The tag-name can be used to style all the same tags the same way.
ID
The id attribute can be used to give an element an unique identifier. This id can be selected via CSS.
A pound symbol # indicates the following string is an id-name:
Class
Multiple elements can have the same class-name set. Elements with a certain class can be targeted/selected via this class-name.
Strings prefixed with a dot . are considered class-names in CSS.
Combining selectors
If multiple selectors are provided, separated by a comma, ,, the defined rules will apply for all the elements matching any of the selectors:
CSS selector rules can also be composed out of multiple selectors. This allows for a more detailed/specific selection.
Elements matching multiple rules
selector1.selector2 {}Selectors can be chained concatenated into a longer selection to make the selection more specific.
For example select only the p-tags with a certain class:
In this case p.classname means:
- Select all elements with class
classname - From all the elements with class
classname, select allp-tags.
You can make these selectors as long and as complex as you want:
div.class1.class2.class3…
Elements inside another element
selector1 selector2 {}Multiple selectors separated by spaces indicate nesting. The last selector should be found inside the previous, inside the previous, …
Info: Inside in this context means, the element must be wrapped by the other element:
Is doesn’t matter how many other tags are in-between the parent and the nested element:
Direct children of an element
selector1 > selector2 {}The > symbol between two selectors indicates an direct parent -> child relationship. By this we mean the second element must be an immediate child of the first selector. No other tags may wrap the child element.
Siblings
selector1 ~ selector2 {}The ~ symbol between two selectors, selects all the elements that match the second selector who exist after the first selector and have the same parent.
Direct siblings
selector1 + selector2 {}The + symbol between two selectors, selects the first element that matches the second selector, is located directly after the first selector and have the same parent.
More info on selector combinators
Special selectors
last-child
selector:last-child {}This selection modifier targets the last element matching the given selector:
In the example is the div coloured red, the last div in the .parent tag.
nth-child
selector:nth-child( n ... ) {}The nth-child modifier targets the elements matching a simple equation where n is the position of the element in the list.
<style type="text/css">

   .parent div:nth-child( 2n + 1) {

      color: red;
   }

   .parent div:nth-child( 2n ) {

      color: green;
   }

   .parent div:nth-child( 3 ) {

      background: lightyellow;
   }

</style>

<div class="parent">
    <div class="selector1">
        Content of div 1
    </div>

    <div class="selector2">
        Content of div 2
    </div>

    <div class="another-class">
        Content of div 3
    </div>

    <div class="selector2">
        Content of div 4
    </div>
</div>2n + 1: all odd elements (theoddkeyword can also be used::nth-child(odd))2n: all even elements (theevenkeyword can also be used::nth-child(even))3: the third element
Hover
selector:hover {

    text-decoration: underline;
}
Via the hover selector allows us to apply styles to an element only when the mouse hovers over the element.
For example: overline a link when the mouse passes over the element:
CSS properties
http://www.w3schools.com has a very good explanation of most of the CSS properties. The headers of the listed properties are links to the corresponding http://www.w3schools.com-website. These linked web-pages are considered part of the course material!
Colors
Colors in CSS are most often specified by:
- a valid color name - like “red”
- an RGB value - like “rgb(255, 0, 0)”
- a HEX value - like “#ff0000”
Background
An element can be given a background:
div {

    background: red;
}
Border
An element can be given a border:
div {

    border: solid red 1px;
    border: dashed #bbb 1px;
}
Margin
The margin defines how far away other, external, elements are pushed away from the border of the styled element.
div {

    margin: 15px; /* All sides the same margin */
    margin: 15px 30px; /* Top and bottom: 15 px, left and right side: 30px*/
    margin: 15px 30px 45px 60px; /* top: 15px, right:30px, bottom:45px, left: 60px */
}
Padding
The padding defines how far away text, and other child, elements should stay away from the border of the element.
div {

    padding: 15px; /* All sides: 15px */
    padding: 15px 30px; /* Top and bottom: 15 px, left and right side: 30px*/
    padding: 15px 30px 45px 60px; /* top: 15px, right:30px, bottom:45px, left: 60px */
}
Height and width
The width and the height of an element can be set via css.
div {

    height: 500px;
    width: 150px;
}
Box model
An element is composed out of multiple components which all influence the size of the element:
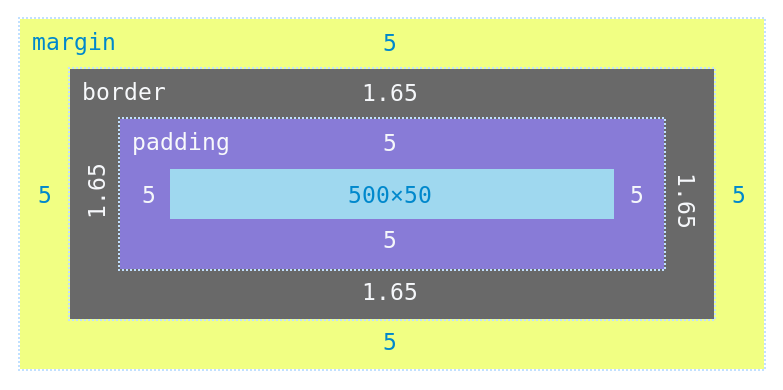 ;
;
- Content - The content of the box, where text and images appear
- Padding - Clears an area around the content. The padding is transparent
- Border - A border that goes around the padding and content
- Margin - Clears an area outside the border. The margin is transparent
The box-sizing-property influences how all these components add up to the total size of the element.
content-box: Default. The width and height properties (and min/max properties) includes only the content. Border, padding, or margin are not includedborder-box: The width and height properties (and min/max properties) includes content, padding and border, but not the margin
Outline
Outline draws a border around the boxmodel.
div {

    outline: solid green 1px;
}
Font
Customize the appearance of a font:
- font-color
- font-size
- font-weight ( how bold is the font)
- font-style (italic or not)
- font-family (Arial, serif or sans-serif, etc)
- font-variant (small-caps or not)
div{
    font-size: 1.1em;
    color: blue;
    font-weight: bold;
    font-style: italic;
    font-family: serif;
    font-variant: small-caps;
}
Text
We can style more than the appearance of the font, we can also define:
- text-align: left, right, centered of justified
- text-decoration: overline, underline or line-through
- word-spacing
- letter-spacing
- …
div {
    text-align: center;
    text-decoration: underline;
    word-spacing: 5px;
    letter-spacing: 5px
  }
Link
A link can be in one of four states:
a:link- a normal, unvisited linka:visited- a link the user has visiteda:hover- a link when the user mouses over ita:active- a link the moment it is clicked
All these states can be styled independently.
a:hover {

    color: pink;
}
List
The bullet of a list (ul or ol) can also styles:
div {
    list-style-type: square;
    list-style-position: inside;
    list-style-image: url("custom-bullet.gif");
}
Table
HTML tables can be styled heavily:
- border: style the borders of the table.
- border-collapse: merge table cell borders.
Margins, paddings, nth-child selectors, etc. can also be applied.
Display and visibility
The display-property defines how an elements behaves:
- block: like a div, p, pre, …
- inline: like span, small, strong, …
inline-block: inline, but can be given a width/height, etc- hidden: hide the element.
The visibility-property allows one to hide an element from view, but is still occupies space and interacts with the other DOM-elements.
div {

    display: none;
    visibility: hidden;
}
Position
This property defines how an element behaves in the page flow. There are four possible values:
static: default -> go with the flowrelative: position relative to default position.fixed: postion relative to viewport (eg.: browser window)absolute: relative to the nearest positioned (= notstatic) ancestor
div {

    position: absolute;
}
Overflow
The overflow-property defines what should happen if the contents of an element is larger than the defined dimensions.
- visible: just show the content, don’t take the boundries into considiration.
- hidden: hide the overflowing content
- scroll: show scollbars
- auto: create scrollbars if needed.
overflow-x and overflow-y
div {

    overflow: hidden;
}
Float
Defining float to left or right will extract an element out of the normal page flow and float all the page content around this element.
div {

    float: right;
}
Align
Elements can be aligned in their parent via three methods. These methods don’t always work in all circumstances, so sometimes one must be choosen over the other.
text-align: left, right or centered -> child elements are alignedmargin:0 auto-> no margin top and bottom, the sides is evenly devided == element is centered…top,right,bottom,left: specify distance of the side of an element to its parent. Works only on absolute or fixed positions
Exercises
Exercise:
Make a web-page with:
- Yellow background
- Red header:
Hello World
Exercise:
Make a table with three columns: first name, last name, age where:
- first column text is red
- second column text is blue
- third column text is green
- table caption is underline and overlined
- Extra: add total sum column
Exercise:
Make a table with three columns: first name, last name, age where:
- only columns have borders
- all even rows have a gray background
- extra: row where mouse is passing over: darker background
Exercise:
Create an web-page with:
- A header:
My webpage - An image
- Text flowing around the image.
- A copyright footer
Exercise:
Create a horizontal bar-plot with four bars:
- Bar 1: 75%
- Bar 2: 25%
- Bar 3: 50%
- Bar 4: 100%
Exercise:
Create a vertical bar-plot with four bars:
- Bar 1: 75%
- Bar 2: 25%
- Bar 3: 50%
- Bar 4: 100%
Exercise:
Re-create the HTML skeleton of a wiki page: https://en.wikipedia.org/wiki/FASTA_format
Start from the HTML skeleton created during the HTML exercises
Exercise:
Create a webpage with information about the four DNA nucleotides:
- A
- T
- C
- G
Each of this pages should contain:
- a header
- an image of the molecule
- some info about the nucleotide
All of this can be fetched from wikipedia… https://en.wikipedia.org/wiki/Adenosine, https://en.wikipedia.org/wiki/Thymidine, https://en.wikipedia.org/wiki/Cytosine, https://en.wikipedia.org/wiki/Guanine.
The text should flow around the image.
Create a landing page. This page will welcome the user and link to the other pages.
Display a navigation bar on top of each page.