Table of contents
- Introduction
- Getting started
- HTML Basics
- CSS
- PHP Basics
- PHP and HTML
- IO
- PHP functions
- Beyond this course
Introduction
The goal of this course is to provide an introduction to dynamic webpages (HTML, CSS) powered by PHP.
During this course the student will learn how to create a static HTML webpage styled by CSS.
Finally the webpages should become dynamic powered by the PHP programming language.
Resources
The main documentation for this course is a site and can be found at https://asoete.github.io/howest-webtechnology. The main advantage of using a site as a textbook is that the included examples and snippets can be rendered/formatted by the browser on the fly.
A PDF version of this document is also available. But keep in mind that some HTML features will be lost in the conversion to a pdf.
There are no slides available, all the key aspects of this course will introduced via examples during the lessons. These examples and example solutions to the exercises, made during this course, will be published in a git repository on github: https://github.com/asoete/howest-webtechnology-code.
This course is a very practical course. Making exercises and exploring/fiddling with code is the best way to learn and get acquainted with all the aspects featured in this course.
Additional resources
An in depth guide/reference/manual for PHP can be found at http://php.net
For an HTML and CSS reference see http://www.w3schools.com/html and http://www.w3schools.com/css
Contact
If you have questions about the contents of this course or get stuck during a certain exercise, please ask a question via de discussions on LEHO. This way fellow students can help you with your problem or questions.
I will also monitor the discussions page and post answers there.
If you have any remaining questions, please contact me via arne.soete@howest.be
Code in this document
This course will feature a lot of code. The source-code of all the snippets in this manual can be found here.
The source and the output of each snippets are always displayed whenever a snippet is included.
Example:
Getting started
This course requires some software to be installed.
Normally these packages are already installed on the provided VM. If not, they can easily be installed by running:
Press y when prompted Is this ok [y/N]:.
This document and all the exercises/examples are hosted on GitHub. This means a local copy of the source can be obtained easily and kept in sync with the latest changes and updates.
This website source can be found at https://github.com/asoete/howest-webtechnology and the result viewed at https://asoete.github.io/howest-webtechnology
All the code created during the lessons will be made available at https://github.com/asoete/howest-webtechnology-examples.
Init workspace
- Create your own exercises directory
You can store all your scripts in this folder…
Get local copy of this site.
Although all documents are hosted online (https://asoete.github.io/howest-webtechnology) it is recommended to host the cursus-site locally.
Github doesn’t allow the execution of PHP scripts, so the exercise solution may not work as they should because Github is preventing PHP-code execution…
The following steps must be taken to start/open the site locally:
- Get an initial copy of the repository:
- To get the latest version/updates
- Start a local instance of the site:
And open http://localhost:8000 in a web browser.
Get local copy of the exercises and examples solutions
- Get an initial copy of the repository located at https://github.com/asoete/howest-webtechnology-examples:
cd ~/webtechnology
git clone https://github.com/asoete/howest-webtechnology-examples.git solutions-and-examples
This command will create a `solutions-and-examples`-folder which will contain all the code featured during the lessons:
* Example snippet
* Exercise solutions- To get the latest version (aka. update the repository) run:
git pull) will most likely fail. So don’t modify the contents in this folder…
Info: When you do encounter errors while pulling, run:
This will reset the repository to be identical to the one on GitHub. Be warned: local modifications will be lost…
Final result
If you complete all of the steps above, you will end up with a workspace that looks like this:
~/webtechnology
├── cursus
├── exercises
└── solutions-and-examples
Editors
GUI editors (present in repositories)
These editors come shipped with the default enabled package repository and are only a sudo dnf install... away.
Gedit
This is a very basic editor equipped for basic file editing. Installed by default.
https://wiki.gnome.org/Apps/Gedit
sudo dnf install gedit

# install additional plugins for more "advanced" features linke snippets
sudo dnf install gedit-plugins
Geany
This is a very little more advanced editor equipped for simple programming.
Search dnf for additional plugins and install them:
sudo dnf search geany-plugins

# Example install spellcheck
sudo  dnf install geany-plugins-spellcheck
Gnome builder
Gnome builder is a full featured Integrated Development Environment (IDE) with advanced features.
https://wiki.gnome.org/Apps/Builder
https://builder.readthedocs.io/en/latest/exploring.html
GUI editors (third party)
Some editors are not present in the default repositories because they do not conform to the Free and Open Source policies Fedora upholds.
VScode / VSCodium
Microsoft publishes a very capable and popular code editor named VSCode: https://code.visualstudio.com/
There is however no open build of this editor. This is what VSCodium is trying to solve: https://vscodium.com/
When we [Microsoft] build Visual Studio Code, we do exactly this. We clone the vscode repository, we lay down a customized product.json that has Microsoft specific functionality (telemetry, gallery, logo, etc.), and then produce a build that we release under our license.
When you clone and build from the vscode repo, none of these endpoints are configured in the default product.json. Therefore, you generate a “clean” build, without the Microsoft customizations, which is by default licensed under the MIT license
Installation:
sudo tee -a /etc/yum.repos.d/vscodium.repo << 'EOF'
[gitlab.com_paulcarroty_vscodium_repo]
name=gitlab.com_paulcarroty_vscodium_repo
baseurl=https://paulcarroty.gitlab.io/vscodium-deb-rpm-repo/rpms/
enabled=1
gpgcheck=1
repo_gpgcheck=1
gpgkey=https://gitlab.com/paulcarroty/vscodium-deb-rpm-repo/raw/master/pub.gpg
metadata_expire=1h
EOF
sudo dnf search codium
sudo dnf install codium.x86_64
Command line editors
These are command line editors run from within a terminal. They are most commonly used to edit configuration files and can also be used over SSH.
With some configuration they can also be used for more advanced editing and code development.
ViM
This is the editor you may be seen during the lessons. It has quite a steep learning curve. Be advised!
Nano
This editor is used during BIT01 Linux to edit config files.
Emacs
http://www.gnu.org/software/emacs/
HTML Basics
HTML is an XML subset. This means it is composed out of tags which can contain attributes.
Tags
An HTML-tag indicator starts with < and ends with >, for example: <body>.
There are two types of HTML-tags:
- Non self-enclosing tags
- Self-enclosing tags
Non self-enclosing tags
Non self-enclosing tags exist out of two parts:
- An opening part:
<tag> - And a closing part:
</tag>. The closing part is identified by the forward slash (/) before the tag-name.
These opening and closing tags can contain plain text and/or additional HTML markup.
Example: <strong>Bold Font</strong> (This tag formats its content in a bold font: Bold Font)
The whole (start + content + end) is an HTML element.
Self-enclosing tags
A self-enclosing tag has no content. So the closing part is left of:
Example: <br> (this will insert a newline into your HTML)
Sometimes you may see self-closing tags used like <tag />, this trailing tag is optional since HTML5 and can be left of.
Attributes
Attributes modify the behaviour of a tag.
For example the a-tag converts a piece of text into a clickable link.
The href-attribute defines where the link should point to:
Attributes are also used to modify the appearance of a tag. Later in this course we’ll see more detailed examples of this.
A valid HTML document
A valid HTML5 document requires a bit of boilerplate:
<!DOCTYPE html>
<html lang="en">
<head>
    <!-- Your webpages metadata -->
</head>
<body>
    <!-- your webpage specific content -->
</body>
</html>
This minimal markup tells the browser to treat the document as a HTML5 document.
The document head
The head-tag allows the developer to define meta-data about the webpage. It is a wrapper around multiple other tags.
The head-tag may only be defined once in the complete document.
Everything defined within the head element will not be visible in the HTML document. The head content can have an effect on the appearance of the page but it’s content will not be visualised.
Title
The title tag sets the web-page title. This title is displayed by the browser in the browser-tab.
Style
We will address styling later in this course but for now it is sufficient to know that style information should be included in the head of a web-page.
Raw style
The style-tag allows to include raw CSS rules in the documents
External style sheets
The link-tag allows to external style sheets into the document. (Do not confuse this tag with the a-tag…).
We will only ever include CSS-files to style our web-pages. The provided attributes in the example are required to include a CSS-file and avoid browser quirks.
The document body
The body-tag should wrap all the content to be displayed.
Exercise:
- Create a valid HTML-document with
- Document title: Hello World
- Content:
Hello World from the my first web-page
HTML: Hello World
Create a text file name hello-world.html
With contents:
<!DOCTYPE html>
<html lang="en">
<head>
    <title>Hello World</title>
</head>
<body>
    Hello World from my first web-page.
</body>
</html>
Open the local HTML file in the browser.
Headers: H*
The purpose of a header is to indicate the start of a new block and add an appropriate heading.
The hn-tags come in 6 variations. From to highest order header h1 to the lowest h6.
The browser auto-formats these headers accordingly from largest to smallest font-size.
Exercise:
- Create a header for each
Hn-tag
Containers
The purpose of these types of tags is to wrap other content. Why the content should be wrapped can vary:
- To indicate semantic meaning (new paragraph, a quote, …)
- To position and/or style the contents in the container.
They are also referred to as block-elements
Paragraphs p
The p-tag encloses a blob of related text into a paragraph
Content before...
<p>
   Lorem ipsum dolor sit amet, consetetur sadipscing elitr, sed diam nonumy
   eirmod tempor invidunt ut labore et dolore magna aliquyam erat, sed diam
   voluptua. At vero eos et accusam et justo duo dolores et ea rebum. Stet clita
   kasd gubergren, no sea takimata sanctus est Lorem ipsum dolor sit amet.
</p>
Content after...Generic container div
The div defines a division in the document. It is used a lot to wrap some content and apply styles.
It has no special styles by default
Content before...
<div>
   Lorem ipsum dolor sit amet, consetetur sadipscing elitr, sed diam nonumy
   eirmod tempor invidunt ut labore et dolore magna aliquyam erat, sed diam
   voluptua. At vero eos et accusam et justo duo dolores et ea rebum. Stet clita
   kasd gubergren, no sea takimata sanctus est Lorem ipsum dolor sit amet.
</div>
Content after...Pre-formatted text: pre
The pre keeps all white-space in the element (in contrast to all the other elements). The text is also displayed in a monospaced font.
Content before...
<pre>
   Lorem ipsum dolor sit amet, consetetur sadipscing elitr, sed diam nonumy
   eirmod tempor invidunt ut labore et dolore magna aliquyam erat, sed diam
   voluptua.

   At vero eos et accusam et justo duo dolores et ea rebum. Stet clita
   kasd gubergren, no sea takimata sanctus est Lorem ipsum dolor sit amet.
</pre>
Content after...Blockquote blockquote
The blockquote-tag is used to denote some block of text as a quote from another source.
Content before...
<blockquote>
   Lorem ipsum dolor sit amet, consetetur sadipscing elitr, sed diam nonumy
   eirmod tempor invidunt ut labore et dolore magna aliquyam erat, sed diam
   voluptua. At vero eos et accusam et justo duo dolores et ea rebum. Stet clita
   kasd gubergren, no sea takimata sanctus est Lorem ipsum dolor sit amet.
</blockquote>
Content after...Horizontal line: hr
The hr isn’t really a container, it can’t contain other elements, but it is a block element. The tag inserts a line into the document. This can be used to split / separate sections.
Exercise:
- Create a block of text an wrap it in.
- No tags
- div tags
- p tags
- blockquote tags
Inline tags
These tags are inline because they do not start a new block (identified by new lines) as the previous tags.
Their purpose is either to give a specific style and semantic meaning to an element or to extend a certain functionality to the element.
Anchors (links): a
The a is used to link to other web-pages.
In order the function, the href-attribute is required on the a-element.
Exercise:
- Create links to
- google.com
- howest.be
- php.net
- github.com
A newline: br
The br insert a newline into the document.
Inline preformat: code
The code-tag is to inline elements what pre is to block elements. It will preserve white space and add a monospaced font in an inline way.
Emphasise text: em
The em-tag allows to emphasise certain text.
Small text: small
The small-tag indicates the browser to use a smaller font-size to visualise this content.
Inline wrap text: span
The span-tag is a generic wrapper. It has no special semantic meaning. The span-tag is mostly used to style/target some text.
Strike text: strike
The strike-tag is used to strike through some text.
Bold text: strong
The strong-tag can be used to make text bold.
Inline quote text: q
The q-tag is used to indicate certain inline text was quoted from an external source.
Image img
The img-tag can be used to inert images into the markup. The src-attribute is required and specifies the location of the image. The location can be a local path, this means a path form the current script directory to the image location or a full (absolute) URL path.
Exercise:
Make a web-page with links to:
- google.com
- howest.be
- GitHub.com
Print the following text so the sentences are broken up as below.
HTML is a markup language browser understand to format documents.
CSS is a way to style this markup.
PHP is a programming language.
It is used to dynamically generate HTML-markup.Print the following text so
hello worldis emphasised.Let’s emphasise hello world in this sentence.
Print the following text so
hello worldis smallerLet’s make hello world smaller in this sentence.
Print the following text so
hello worldis boldLet’s make hello world bold in this sentence.
Print the following text so
hello worldis crossed off.Let’s strike hello world in this sentence.
Multi element markup
Some elements don’t make any sense on their own. They should be part of a larger elements-group.
Fieldset
fieldset is a container with an (optional) header (legend ).
This container is often used to group related from items together.
Lists
A HTML-list is composed of li-tags enclosed by an ul or ol-tag.
Unordered lists ul
Ordered lists ol
Exercise:
- Make an unordered list with your name, age and gender as items
- Make your name bold, age emphasised and gender quoted.
- Make a top 3 ranked list of your favorite dishes
- Add a fourth dish, but with smaller font .
Tables
A simple table is composed out of:
Exercise:
- Make a table with two columns: name and score
- Add 3 rows
- Jan -> 12
- Piet -> 15
- Boris -> 7
- Make the names also headers
- Add a column ‘passes’ and add a V if the number is larger than 10 and an X otherwise.
Attributes
As already seen with the a-tag, attributes can modify the behaviour of an HTML-element.
The a-tag requires the href-attribute to be set. Otherwise the browser has no clue where to take the user on a click.
The attributes are also often used to modify the appearance of an element.
Commonly used attributes:
Class
The class attribute holds a space separated list class-names. The element is member of all the classes specified in the attribute. These classes can be used to style a group of elements the same way.
For example all the elements which are member of the same class (have the same class-name in the class attribute) should have the text colour set to red…
Id
The id-attribute lets you assign a unique identifier to an element.
This identifier should be unique for the whole page and thus occur only once.
If the id is specified in the URL prefixed by a pound symbol (#), the element will be automatically scrolled into view.
Style
The style attribute can be used to apply CSS-rules to a single element.
Generally speaking you should not set the styles via this tag. A dedicated style block in the head of page or an external style sheet are better, more scalable, options. It can however come in handy in this introduction to HTML and CSS.
See HTML and CSS for more info about styling an element.
Title
The title attribute lets you assign a title to an element. This title will be displayed as a tooltip when hovering with the mouse over this element.
Exercises
Exercise:
Add a table of contents (TOC) to the previous page (cv.html).
The TOC should contain all headers, clicking a header should take the user to this header/section
Exercise:
Re-create the HTML skeleton of a wiki page: https://en.wikipedia.org/wiki/FASTA_format
CSS
HTML can be styled via CSS. An HTML-element is selected via CSS selectors. Styles/rules are defined per selector block. Each definition is terminated by a ;. A rules block is enclosed by {, }.
<selector> {
    <property> : <value>;
    <property> : <value> <value>;
}
More info on the CSS syntax at w3schools
Include style information
Elements can be styled via three methods:
- style-attribute (discouraged)
- a style tag in the head (less discouraged)
- an external stylesheet (encouraged)
Style attribute
Use this method to quickly test some rule. Not as a permanent style. This way of managing styles is discouraged because it is a less maintainable way of styling web-pages. For example: styles can not be shared by elements…
Style tag
The style-tag that should be defined in the head of the document. The styles defined in this tag apply to the complete page.
<!DOCTYPE html>
<html lang="en">
<head>
    <meta charset="UTF-8">
    <title>My pae title</title>

    <style type="text/css">
        .selector {

            property: value;
        }
    </style>

</head>
<body>
    <!-- the body -->
</body>
</html>
Even though the styles are defined only once, elements can share them via selectors ( tag-name, classes, …)
External style sheet
The CSS-rules can also be defined in a dedicated CSS-file. This file can be included in a web-page via the link-tag
The rules defined in the file can be included in as many HTML-pages as you want. This makes it the most scalable method of defining and including CSS-rules.
<!DOCTYPE html>
<html lang="en">
<head>
    <meta charset="UTF-8">
    <title>My pae title</title>

    <link rel="stylesheet" type="text/css" href="style.css">

</head>
<body>
    <!-- the body -->
</body>
</html>CSS selectors
In order to apply rules to a certain element, the element must be targeted, selected.
CSS has the notion of selectors to target elements.
Tag-name
The tag-name can be used to style all the same tags the same way.
ID
The id attribute can be used to give an element an unique identifier. This id can be selected via CSS.
A pound symbol # indicates the following string is an id-name:
Class
Multiple elements can have the same class-name set. Elements with a certain class can be targeted/selected via this class-name.
Strings prefixed with a dot . are considered class-names in CSS.
Combining selectors
If multiple selectors are provided, separated by a comma, ,, the defined rules will apply for all the elements matching any of the selectors:
CSS selector rules can also be composed out of multiple selectors. This allows for a more detailed/specific selection.
Elements matching multiple rules
selector1.selector2 {}Selectors can be chained concatenated into a longer selection to make the selection more specific.
For example select only the p-tags with a certain class:
In this case p.classname means:
- Select all elements with class
classname - From all the elements with class
classname, select allp-tags.
You can make these selectors as long and as complex as you want:
div.class1.class2.class3…
Elements inside another element
selector1 selector2 {}Multiple selectors separated by spaces indicate nesting. The last selector should be found inside the previous, inside the previous, …
Info: Inside in this context means, the element must be wrapped by the other element:
Is doesn’t matter how many other tags are in-between the parent and the nested element:
Direct children of an element
selector1 > selector2 {}The > symbol between two selectors indicates an direct parent -> child relationship. By this we mean the second element must be an immediate child of the first selector. No other tags may wrap the child element.
Siblings
selector1 ~ selector2 {}The ~ symbol between two selectors, selects all the elements that match the second selector who exist after the first selector and have the same parent.
Direct siblings
selector1 + selector2 {}The + symbol between two selectors, selects the first element that matches the second selector, is located directly after the first selector and have the same parent.
More info on selector combinators
Special selectors
last-child
selector:last-child {}This selection modifier targets the last element matching the given selector:
In the example is the div coloured red, the last div in the .parent tag.
nth-child
selector:nth-child( n ... ) {}The nth-child modifier targets the elements matching a simple equation where n is the position of the element in the list.
<style type="text/css">

   .parent div:nth-child( 2n + 1) {

      color: red;
   }

   .parent div:nth-child( 2n ) {

      color: green;
   }

   .parent div:nth-child( 3 ) {

      background: lightyellow;
   }

</style>

<div class="parent">
    <div class="selector1">
        Content of div 1
    </div>

    <div class="selector2">
        Content of div 2
    </div>

    <div class="another-class">
        Content of div 3
    </div>

    <div class="selector2">
        Content of div 4
    </div>
</div>2n + 1: all odd elements (theoddkeyword can also be used::nth-child(odd))2n: all even elements (theevenkeyword can also be used::nth-child(even))3: the third element
Hover
selector:hover {

    text-decoration: underline;
}
Via the hover selector allows us to apply styles to an element only when the mouse hovers over the element.
For example: overline a link when the mouse passes over the element:
CSS properties
http://www.w3schools.com has a very good explanation of most of the CSS properties. The headers of the listed properties are links to the corresponding http://www.w3schools.com-website. These linked web-pages are considered part of the course material!
Colors
Colors in CSS are most often specified by:
- a valid color name - like “red”
- an RGB value - like “rgb(255, 0, 0)”
- a HEX value - like “#ff0000”
Background
An element can be given a background:
div {

    background: red;
}
Border
An element can be given a border:
div {

    border: solid red 1px;
    border: dashed #bbb 1px;
}
Margin
The margin defines how far away other, external, elements are pushed away from the border of the styled element.
div {

    margin: 15px; /* All sides the same margin */
    margin: 15px 30px; /* Top and bottom: 15 px, left and right side: 30px*/
    margin: 15px 30px 45px 60px; /* top: 15px, right:30px, bottom:45px, left: 60px */
}
Padding
The padding defines how far away text, and other child, elements should stay away from the border of the element.
div {

    padding: 15px; /* All sides: 15px */
    padding: 15px 30px; /* Top and bottom: 15 px, left and right side: 30px*/
    padding: 15px 30px 45px 60px; /* top: 15px, right:30px, bottom:45px, left: 60px */
}
Height and width
The width and the height of an element can be set via css.
div {
height: 500px;
width: 150px;
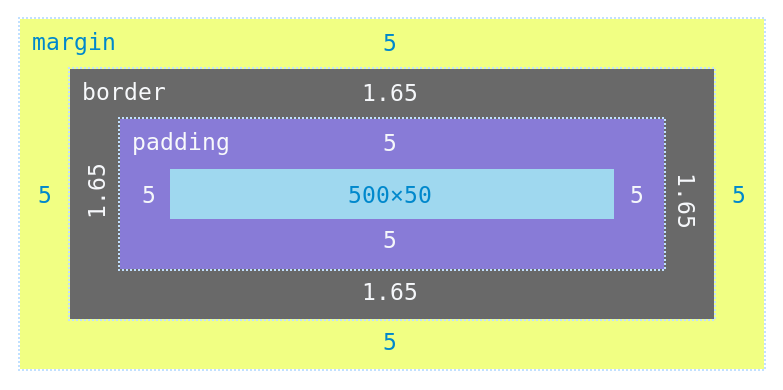
}Box model
An element is composed out of multiple components which all influence the size of the element:
 ;
;
- Content - The content of the box, where text and images appear
- Padding - Clears an area around the content. The padding is transparent
- Border - A border that goes around the padding and content
- Margin - Clears an area outside the border. The margin is transparent
The box-sizing-property influences how all these components add up to the total size of the element.
content-box: Default. The width and height properties (and min/max properties) includes only the content. Border, padding, or margin are not includedborder-box: The width and height properties (and min/max properties) includes content, padding and border, but not the margin
Outline
Outline draws a border around the boxmodel.
div {

    outline: solid green 1px;
}
Font
Customize the appearance of a font:
- font-color
- font-size
- font-weight ( how bold is the font)
- font-style (italic or not)
- font-family (Arial, serif or sans-serif, etc)
- font-variant (small-caps or not)
div{
    font-size: 1.1em;
    color: blue;
    font-weight: bold;
    font-style: italic;
    font-family: serif;
    font-variant: small-caps;
}
Text
We can style more than the appearance of the font, we can also define:
- text-align: left, right, centered of justified
- text-decoration: overline, underline or line-through
- word-spacing
- letter-spacing
- …
div {
    text-align: center;
    text-decoration: underline;
    word-spacing: 5px;
    letter-spacing: 5px
  }
Link
A link can be in one of four states:
a:link- a normal, unvisited linka:visited- a link the user has visiteda:hover- a link when the user mouses over ita:active- a link the moment it is clicked
All these states can be styled independently.
a:hover {

    color: pink;
}
List
The bullet of a list (ul or ol) can also styles:
div {
    list-style-type: square;
    list-style-position: inside;
    list-style-image: url("custom-bullet.gif");
}
Table
HTML tables can be styled heavily:
- border: style the borders of the table.
- border-collapse: merge table cell borders.
Margins, paddings, nth-child selectors, etc. can also be applied.
Display and visibility
The display-property defines how an elements behaves:
- block: like a div, p, pre, …
- inline: like span, small, strong, …
inline-block: inline, but can be given a width/height, etc- hidden: hide the element.
The visibility-property allows one to hide an element from view, but is still occupies space and interacts with the other DOM-elements.
div {

    display: none;
    visibility: hidden;
}
Position
This property defines how an element behaves in the page flow. There are four possible values:
static: default -> go with the flowrelative: position relative to default position.fixed: postion relative to viewport (eg.: browser window)absolute: relative to the nearest positioned (= notstatic) ancestor
div {

    position: absolute;
}
Overflow
The overflow-property defines what should happen if the contents of an element is larger than the defined dimensions.
- visible: just show the content, don’t take the boundries into considiration.
- hidden: hide the overflowing content
- scroll: show scollbars
- auto: create scrollbars if needed.
overflow-x and overflow-y
div {

    overflow: hidden;
}
Float
Defining float to left or right will extract an element out of the normal page flow and float all the page content around this element.
div {

    float: right;
}
Align
Elements can be aligned in their parent via three methods. These methods don’t always work in all circumstances, so sometimes one must be choosen over the other.
text-align: left, right or centered -> child elements are alignedmargin:0 auto-> no margin top and bottom, the sides is evenly devided == element is centered…top,right,bottom,left: specify distance of the side of an element to its parent. Works only on absolute or fixed positions
Exercises
Exercise:
Make a web-page with:
- Yellow background
- Red header:
Hello World
Exercise:
Make a table with three columns: first name, last name, age where:
- first column text is red
- second column text is blue
- third column text is green
- table caption is underline and overlined
- Extra: add total sum column
Exercise:
Make a table with three columns: first name, last name, age where:
- only columns have borders
- all even rows have a gray background
- extra: row where mouse is passing over: darker background
Exercise:
Create an web-page with:
- A header:
My webpage - An image
- Text flowing around the image.
- A copyright footer
Exercise:
Create a horizontal bar-plot with four bars:
- Bar 1: 75%
- Bar 2: 25%
- Bar 3: 50%
- Bar 4: 100%
Exercise:
Create a vertical bar-plot with four bars:
- Bar 1: 75%
- Bar 2: 25%
- Bar 3: 50%
- Bar 4: 100%
Exercise:
Re-create the HTML skeleton of a wiki page: https://en.wikipedia.org/wiki/FASTA_format
Start from the HTML skeleton created during the HTML exercises
Exercise:
Create a webpage with information about the four DNA nucleotides:
- A
- T
- C
- G
Each of this pages should contain:
- a header
- an image of the molecule
- some info about the nucleotide
All of this can be fetched from wikipedia… https://en.wikipedia.org/wiki/Adenosine, https://en.wikipedia.org/wiki/Thymidine, https://en.wikipedia.org/wiki/Cytosine, https://en.wikipedia.org/wiki/Guanine.
The text should flow around the image.
Create a landing page. This page will welcome the user and link to the other pages.
Display a navigation bar on top of each page.
PHP Basics
PHP is a widely-used general-purpose scripting language that is especially suited for Web development and can be embedded into HTML.
This means PHP can be used to generate HTML. This allows us to adhere to the DRY (Don’t Repeat Yourself
) principle.
What makes a PHP-script
A PHP-script is identified by its .php extension and the PHP-tags in the file.
PHP tags
PHP interprets only the code enclosed within the special PHP-tags.
- Opening tag:
<?php - Closing tag:
?>
Notice that the code outside of the PHP-tags is not interpreted and is printed out unchanged.
A valid PHP instruction generally has the form:
Each statement must be terminated by a semicolon (;)!
An exception to this rule are loops and conditionals. These can encapsulate a block of code in curly brackets {} and thus end in a }…
Comments
Single line comments
PHP will ignore everything behind a # or //.
Multi-line comments
PHP will ignore everything enclosed by /* and */.
Execute a PHP-script
To get acquainted with php we will start of on the command line and work our way up to PHP as a web server.
PHP at its core is a program which reads a source file, interprets the directives and prints out the result.
Basic invocation:
The above command will print the output to the STDOUT.
Hello World
The obligatory hello world.
Create a file: hello-world.php with content:
sudo dnf install php
Run it via:
on the command line.
Types and variables
Variables are a way to store some information and give the storage space a name. Via this name, the content that was stored can be retrieved.
A variable is identified by the leading dollar$-symbol followed by a alpha-numeric sequence.
Warning: It is not allowed to start variable name with a number:
$abc |
OK |
$abc123 |
OK |
$123abc |
Not allowed |
PHP knows two main types of variables:
- scalars
- arrays
Scalars
A scalar variable can hold an atomic quantity. For example: one string, or one number, …
Types
PHP knows four scalar types:
| Type | Example | Description |
|---|---|---|
| Integers | 42 |
Whole numbers |
| Floats | 3.1415 |
Real numbers |
| Strings | 'Hello world' |
Strings can be any number or letter in a sequence (enclosed by single ' or double " quotes, otherwise php may interpret it as a directive…) |
| Boolean | true or false |
binary true or false |
Declare
Assign a value to a variable:
Generic syntax:
Examples:
Printing/Displaying scalars
A scalar can be printed via two methods:
Echo
Generic syntax:
Echo outputs the provided scalars.
Multiple scalars can be printed at once, just separate them by a comma ,.
Example:
Generic syntax:
Print can only output one scalar at the time. (This can be circumvented via concatenation…)
Example:
String concatenation and interpolation Or single vs. double quotes
Scalars can be combined, concatenated into larger strings.
The concatenation symbol is a dot: ..
You may have already noticed that printing variables enclosed by single quotes ' doesn’t work. The literal variable name is printed instead.
To instruct PHP to interpret the variables, and other special sequences, the string must be enclosed by double quotes: ".
Special character sequences
The following special character sequences are interpreted by PHP and formatted accordingly…
| Sequence | Result |
|---|---|
\n |
New line |
\r |
New line (Windows) |
\t |
The literal |
\$ |
Literal $ (escaping prevents variable interpreation) |
\" |
Literal " (escaping prevents string termination). |
Example:
<?php

$variable = "hello world";

echo "1. The value of the variable is: $variable.";
echo "2. The value of the variable is: $variable.\n";
echo "\t3. The value of the variable is: $variable.\n";
echo "4. The value of the variable is: \$variable.\n";
echo "5. The value of the variable is: \"$variable\".\n";Basic arithmetic
Floats an Integers can be used in arithmetic.
| Example | Name | Result |
|---|---|---|
-$a |
Negation | Opposite of $a. |
$a + $b |
Addition | Sum of $a and $b. |
$a - $b |
Subtraction | Difference of $a and $b. |
$a * $b |
Multiplication | Product of $a and $b. |
$a / $b |
Division | Quotient of $a and $b. |
$a % $b |
Modulus | Remainder of $a divided by $b. |
$a ** $b |
Exponentiation | Result of raising $a to the $b ’th power. Introduced in PHP 5.6. |
Example:
Arrays
Arrays are able to hold more than one item.
An item is stored in the array at a named location. If no name/key/index is explicitly specified, an numeric index from 0 to n (where n is the number of items in the array minus one) is used as the keys.
Declare
An array can be declared in two ways:
The []-method can only be used from PHP version 5.4 and higher.
A normal typical array is a list of values. The keys of those values are automatically assigned, starting with zero 0 and auto incrementing for each element added.
See below for how to print and add values to arrays
The keys can however be specified manually:
Print/Display arrays
The function print_r can be used to print an array.
Generic syntax:
Get a value from an array
A value can be retrieved by specifying the array variable name followed by the index you wish to retrieve enclosed in square brackets:
If the key is a string, the appropriate quoting must be used.
Example:
Update a value in an array
An array value can be targeted by its key. This key can also be used to update the value:
Example:
Manipulating arrays
Add an item to the end of an array:
Adding an element at the end of an array can be accomplished by the function array_push or by the square brackets notation ($array[] = $value;).
Add an item in front of an array:
Adding an element in front of an array can be accomplished by the function array_unshift.
Extract the first element from an array
Extracting the first element from an array can be accomplished by the function array_shift.
Extract the last element from an array
Extracting the last element from an array can be accomplished by the function array_pop.
Count the elements in an array
Counting the elements in an array can be accomplished by the function count.
Special arrays
PHP has some special, reserved, arrays. These arrays are created and filled by PHP.
$argv
This array holds all the arguments passed to a PHP-script from the command line.
php print_r-argv.php 'arg1' 'arg2' 123 --optionsArray
(
[0] => print_r-argv.php
[1] => arg1
[2] => arg2
[3] => 123
[4] => --options
)
$_GET
The $_GET-array holds data sent to a webpage via a HTTP-get method.
This corresponds with URL parameters.
Array
(
    [arg1] => hello
    [arg2] => world
    [end] => !
)
$_POST
The $_POST-array holds data sent to a webpage via a HTTP-post method.
This is typically done via a from submission…
$_SESSION
You can store inter-page data in the $_SESSION reserved array.
This inter-page data is typically:
- user info
- preferences
$_FILES
When files are uploaded, PHP stores information about these files in this array.
Example:
Array
(
    [file] => Array
        (
            [name] => MyFile.jpg
            [type] => image/jpeg
            [tmp_name] => /tmp/php/php6hst32
            [error] => UPLOAD_ERR_OK
            [size] => 98174
        )
)
Conditionals
It can be very handy to execute a piece of code only when certain requirements are met. This kind of behaviour can be accomplished via conditionals
The if language structure defines the conditions to fulfil and the accompanying block of code to run if the conditions evaluate to true (enclosed in curly brackets {}).
Additionally an else-block can be defined. The code in this block will be executed when the if-condition evaluated to false.
if( /* condition */ ) {

    /* execute when condition is true */
}
else {

    /* execute when condition is false */
}
On top of this, multiple conditions can be chained into an if-elseif-else construct.
if( /* condition 1 */ ) {

    /* execute when condition 1 is true */
}
elseif( /* condition 2 */ ) {

    /* execute when condition 2 is true */
}
elseif( /* condition 3 */ ) {

    /* execute when condition 3 is true */
}
else {

    /* execute when conditions 1, 2 and 3 are false */
}
Conditionals can also be nested:
if( /* condition 1 */ ) {

    if( /* condition 2 */ ) {

        /* execute when condition 1 and 2 evaluate to true */
    }
    else {

        /* execute when conditions 1 evalutes to true and condition 2 to false */
    }
}
else {

    /* execute when condition 1 evaluates to false*/
}
Comparison operators
| Example | Name | Result |
|---|---|---|
$a == $b |
Equal | true if $a is equal to $b after type juggling. |
$a === $b |
Identical | true if $a is equal to $b, and they are of the same type. |
$a != $b |
Not equal | true if $a is not equal to $b after type juggling. |
$a <> $b |
Not equal | true if $a is not equal to $b after type juggling. |
$a !== $b |
Not identical | true if $a is not equal to $b, or they are not of the same type. |
$a < $b |
Less than | true if $a is strictly less than $b. |
$a > $b |
Greater than | true if $a is strictly greater than $b. |
$a <= $b |
Less than or equal to | true if $a is less than or equal to $b. |
$a >= $b |
Greater than or equal to | true if $a is greater than or equal to $b. |
PHP is a dynamically type language. This means the type of a variable is not set in stone but PHP will try its best to guess the types of variables and convert them (juggle them from one type to the other) where its deemed necessary.
For example:
<?php

$string = '1 as a string';

var_dump($string);

# $string to int = 1 the `+` triggers the type juggling
var_dump( $string + 0);

# -----------------------------------------------------------------------------

var_dump( '1' == 1, 1 == true, 'abc' == true );
var_dump( '1' === 1, 1 === true, 'abc' === true );var_dump prints a variable with type information
Logical operators
Multiple comparisons can be bundled together into one condition. They are combined via the logical operators:
| Example | Name | Result |
|---|---|---|
$a and $b |
And | true if both $a and $b are true. |
$a or $b |
Or | true if either $a or $b is true. |
$a xor $b |
Xor | true if either $a or $b is true, but not both. |
! $a |
Not | true if $a is not true. |
$a && $b |
And | true if both $a and $b are true. |
$a || $b |
Or | true if either $a or $b is true. |
Example:
<?php

if( true or false ) {

   echo "`true or false` evaluated to TRUE\n";
}
else {

   echo "`true or false` evaluated to FALSE\n";
}

echo "----------------------------------------------------------------------\n";

if( !true ) {

   echo "`!true` evaluated to TRUE\n";
}
else {

   echo "`!true` evaluated to FALSE\n";
}

echo "----------------------------------------------------------------------\n";

if( true and false ) {

   echo "`true and false` evaluated to TRUE\n";
}
else {

   echo "`true and false` evaluated to FALSE\n";
}

?>These logical operators can be combined at will. Brackets () can be used to enforce precedence.
Loops
Loops enable you to repeat a block of code until a condition is met.
While
This construct will repeat until the defined condition evaluates to false:
Ctrl+c on the command line to abort the running script.
Danger: The never ending loop:
Info: The pattern $variable = $variable + 1 is used a lot in programming. Therefore shorthand versions of this, and similar operations, are available:
Exercise:
- Make a script that counts from 0 to 10
- Modify the script to count from 50 to 60
- Modify the script to count from 0 to 10 and back to 0
- Modify the script to count from 0 to 30 in steps of 3.
Only while loops are allowed.
For
For is similar to while in functionality. It also loops until a certain condition evaluates to false. The main difference is the boilerplate required to construct the loop.
The for-construct forces you to define the counter variable and the increments right in the construct.
Notice the semi-colons ; between each of the for-parts!
Exercise:
- Make a script that counts from 1 to 10
- Modify the script to count from 0 to 10 and back to 0
- Modify the script to count from 0 to 30 in steps of 3.
Only for loops are allowed.
The for construct can also be used to loop over all elements in an array:
Exercise:
- Fill an array with: [ one, two, three, four, five ];
- Print each word on a single line.
- Modify the script to also print the index before the word:
$index: $value
Foreach
The for and the while construct have their limitations regarding arrays. What if we have an array with custom keys (not a sequential list of integers…)?
We can solve this problem with the foreach construct. This construct is specifically designed to iterate over array items.
Info: The key-placeholder => part is placed into square brackets to indicate that this part of the construct is optional. The part can be omitted when we have no need of the key in the accompanying block but are only interested in the values…
<?php

$array = [ 1, 2, 'three', 'value' ];

print_r($array);

foreach( $array as $value ) {

   echo "The obtained value is: `$value`\n";
}

# ---------------------------------------------------------------------------- #

$array = [
   1 , 2, 3,
   'key1' => 'value1',
   100 => 'hello'
];

print_r($array);

foreach( $array as $key => $value ) {

   echo "Key: `$key` has value: `$value`\n";
}
Flow control
Sometimes (based on a condition) you want to skip a loop iteration or stop the loop prematurely. Tis can be accomplished by use of continue or break,
continue
Stop running the code in the current loop iteration and start the next iteration.
break
Stop executing the loop iteration and break out of the loop.
Commonly used (builtin) functions
isset
The isset function checks whether a PHP variable was created / assigned.
This function returns false if the tested variable isn’t declared before or is equal to null
empty
The empty function checks whether a PHP variable has an empty value.
Examples of empty values: null, "", 0, …
<?php

echo "test undeclared variable\n";
var_dump( empty($some_variable) );
echo "\n";

echo "test declared variable\n";
$some_variable = "hello world";
var_dump( empty($some_variable) );
echo "\n";

echo "test empty variables\n";
$some_variable = "";
var_dump( empty($some_variable) );
$some_variable = 0;
var_dump( empty($some_variable) );
$some_variable = null;
var_dump( empty($some_variable) );strlen
The strlen function returns the length (number of characters) in a string.
str_split
The str_split function parses a string into individual characters and returns an array where each item in the array corresponds to one character in the original string.
strtolower
The strtolower returns a string with all alphabetic characters converted to lowercase.
strtoupper
The strtoupper returns a string with all alphabetic characters converted to uppercase.
explode
The explode function parses a string into individual pieces based on a delimiter and returns an array where each item in the array corresponds to a section in the original string separated by the delimiter.
This function can be used to convert the lines in a file (retrieved via file_get_contents) into an array of lines.
<?php

$string = ">Random Sequence (250 nts sampled from ATGC)
GCCAATGGTATGTCAACTCAGTCTCCCCAACTCTCGTAACTGGTAGAAGG
GTGGAGCATGAATCATGCCATCCATCTCGTATTCGAATCCGTGCGCGCGG
AGCCGAATATTTAAGTATACACACCCGCAGCACGAGCATCGTACTTTGCC
TTTCCAGCATAATTATGCATGAGGTGATAGCGAGATGATTCGGGGTAATG
CCGTTGTACCCGGCCTCGGTCTTTCCGACGACGTCCCAACGCCGACACCA";

$lines = explode("\n", $string);

print_r( $lines );implode
The implode function takes an array and glue as input. The items in the array will be glued together into a new string. Each of the sections in the new output string will be separated by the glue
preg_match
Regular expressions are a very powerful way of detecting patterns in a string.
The complete depth and power of regular expressions are out of the scope of this course but we will use them to detect header lines in multifasta sequences.
Exercises
Exercise:
Create a script that:
- receives a number from the command line
- counts from zero to this number
- counts back from this number to zero
- counts from zero to the number in steps of three
php count-to-number.php 9Count up from 0 to 9:
0
1
2
3
4
5
6
7
8
9
Count down from 9 to 0:
9
8
7
6
5
4
3
2
1
0
Count up from 0 to 9 in steps of 3:
0
3
6
9
Exercise:
Create a script that prints a line of a asterisks * defined by a command line parameter.
php print-asterisks.php 9*********
Exercise:
Create a script that
- prints a square of a asterisks
*if one parameter is defined - Prints a block with width and height if both parameters are defined.
php print-square-of-asterisks.php 9*********
*********
*********
*********
*********
*********
*********
*********
*********
php print-square-of-asterisks.php 15 5***************
***************
***************
***************
***************
Exercise:
Create a script that prints a left + bottom balanced triangle of asterisks with base defined by parameter.
php print-left-bottom-balanced-triangle.php 9*
**
***
****
*****
******
*******
********
Exercise:
Create a script that prints a right + bottom balanced triangle of asterisks with base defined by parameter.
php print-right-bottom-balanced-triangle.php 9 *
**
***
****
*****
******
*******
********
Exercise:
Create a script that prints a center + bottom balanced triangle of asterisks with base defined by parameter.
php print-center-bottom-balanced-triangle.php 9
    **
   ****
  ******
 ********
Exercise:
Create al the triangles again but the base (maximum number of asterisks) should be on top instead of at the bottom…
php print-left-top-balanced-triangle.php 9*********
********
*******
******
*****
****
***
**
*
php print-right-top-balanced-triangle.php 9*********
********
*******
******
*****
****
***
**
*
php print-center-top-balanced-triangle.php 9*********
*******
*****
***
*
Exercise:
Create a script that counts the number of parameters provided
php count-argv.php 9 12 3 5 4 1 8 58 arguments where provided
Exercise:
Create a script that:
- reads a list of numbers from the command line
- prints the list
- prints the number of numbers (count)
- calculates/prints the min, max and average of the numbers
- Print how many times a number occurs in the list
- (prints the list backwards (bonus))
- (prints the list sorted (bonus))
php number-statistics.php 9 12 3 5 4 1 8 5The numbers received:
number 0: 9
number 1: 12
number 2: 3
number 3: 5
number 4: 4
number 5: 1
number 6: 8
number 7: 5
Smallest number: 1
Avg: 5.875
Largest number: 12
Number of numbers: 8
Number occurences
9 -> 1
12 -> 1
3 -> 1
5 -> 2
4 -> 1
1 -> 1
8 -> 1
The numbers in reverse order:
number 7: 5
number 6: 8
number 5: 1
number 4: 4
number 3: 5
number 2: 3
number 1: 12
number 0: 9
Numbers from smallest to largest:
1
3
4
5
5
8
9
12
Exercise:
Create a script which stores the keys of an array as values of another array. (Extract the keys from an array)
php array-keys.php Array
(
[0] => position 1
[1] => position 2
[2] => 3
[3] => four
)
Exercise:
- Create a script which reverses an array.
- Create a script which reverses an array and preserves the keys
php array-reverse.php Array
(
[0] => 4
[1] => three
[2] => world
[3] => hello
)
Array
(
[four] => 4
[3] => three
[position 2] => world
[position 1] => hello
)
Exercise:
Create a script that generates the reverse complement of DNA string:
php dna-reverse-complement.php 'ATGCCGATAGGACTATGGACTATCTAGAGATCTATCAGAGAATATATCCGGGATAATCGGATATCGGCGATAC'orig.: ATGCCGATAGGACTATGGACTATCTAGAGATCTATCAGAGAATATATCCGGGATAATCGGATATCGGCGATAC
comp.: TACGGCTATCCTGATACCTGATAGATCTCTAGATAGTCTCTTATATAGGCCCTATTAGCCTATAGCCGCTATGBonus:
Print bonds:
php dna-reverse-complement-with-bonds.php 'ATGCCGATAGGACTATGGACTATCTAGAGATCTATCAGAGAATATATCCGGGATAATCGGATATCGGCGATAC'orig.: ATGCCGATAGGACTATGGACTATCTAGAGATCTATCAGAGAATATATCCGGGATAATCGGATATCGGCGATAC
|||||||||||||||||||||||||||||||||||||||||||||||||||||||||||||||||||||||||
comp.: TACGGCTATCCTGATACCTGATAGATCTCTAGATAGTCTCTTATATAGGCCCTATTAGCCTATAGCCGCTATGExercise:
Create a script that generates the reverse complement of DNA string and can cope with:
- with Caps and non caps letters
- white space
- unvalid nucleotides (and report these)
php dna-reverse-complement-robust.php 'ATgCXCgAtAgg ACTAtgGaCtA X TCtA g aGaTc TatCAgAgaatAtiXXATCcgggATAATcggAtATCggCGaTaC'orig.: ATgCXCgAtAgg ACTAtgGaCtA X TCtA g aGaTc TatCAgAgaatAtiXXATCcgggATAATcggAtATCggCGaTaC
comp.: TACGGCTATCCTGATACCTGATAGATCTCTAGATAGTCTCTTATATAGGCCCTATTAGCCTATAGCCGCTATG
Invalid NT characters:
X: 4 occurrences
i: 1 occurrences
Exercise:
Create a script that prints the nucleotide frequency of a DNA strand.
Additional: Create a simple bar plot to visualise the percentages.
php dna-frequency.php 'ATGCCGATAGGACTATGGACTATCTAGAGATCTATCAGAGAATATATCCGGGATAATCGGATATCGGCGATAC'input: ATGCCGATAGGACTATGGACTATCTAGAGATCTATCAGAGAATATATCCGGGATAATCGGATATCGGCGATAC
STATS:
A: 24 nts -> 32.876712328767 %
T: 18 nts -> 24.657534246575 %
G: 18 nts -> 24.657534246575 %
C: 13 nts -> 17.808219178082 %
GRAPH:
A: =================================
T: =========================
G: =========================
C: ==================
Exercise:
Create a script that prints the frequency of the characters in a string.
- sort by frequency: low to hight + high to low
- sort by character (and reverse)
- case-insensitive (bonus)
php character-frequency.php 'Hello world, this is a random 123#$ string.'input: Hello world, this is a random 123#$ string.
STATS:
'H': 1 occurences -> 2.3255813953488 %
'e': 1 occurences -> 2.3255813953488 %
'l': 3 occurences -> 6.9767441860465 %
'o': 3 occurences -> 6.9767441860465 %
' ': 7 occurences -> 16.279069767442 %
'w': 1 occurences -> 2.3255813953488 %
'r': 3 occurences -> 6.9767441860465 %
'd': 2 occurences -> 4.6511627906977 %
',': 1 occurences -> 2.3255813953488 %
't': 2 occurences -> 4.6511627906977 %
'h': 1 occurences -> 2.3255813953488 %
'i': 3 occurences -> 6.9767441860465 %
's': 3 occurences -> 6.9767441860465 %
'a': 2 occurences -> 4.6511627906977 %
'n': 2 occurences -> 4.6511627906977 %
'm': 1 occurences -> 2.3255813953488 %
'1': 1 occurences -> 2.3255813953488 %
'2': 1 occurences -> 2.3255813953488 %
'3': 1 occurences -> 2.3255813953488 %
'#': 1 occurences -> 2.3255813953488 %
'$': 1 occurences -> 2.3255813953488 %
'g': 1 occurences -> 2.3255813953488 %
'.': 1 occurences -> 2.3255813953488 %
Order by frequentie:
'H': 1 occurences -> 2.3255813953488 %
'e': 1 occurences -> 2.3255813953488 %
'w': 1 occurences -> 2.3255813953488 %
',': 1 occurences -> 2.3255813953488 %
'h': 1 occurences -> 2.3255813953488 %
'm': 1 occurences -> 2.3255813953488 %
'1': 1 occurences -> 2.3255813953488 %
'2': 1 occurences -> 2.3255813953488 %
'3': 1 occurences -> 2.3255813953488 %
'#': 1 occurences -> 2.3255813953488 %
'$': 1 occurences -> 2.3255813953488 %
'g': 1 occurences -> 2.3255813953488 %
'.': 1 occurences -> 2.3255813953488 %
'd': 2 occurences -> 4.6511627906977 %
't': 2 occurences -> 4.6511627906977 %
'a': 2 occurences -> 4.6511627906977 %
'n': 2 occurences -> 4.6511627906977 %
'l': 3 occurences -> 6.9767441860465 %
'o': 3 occurences -> 6.9767441860465 %
'r': 3 occurences -> 6.9767441860465 %
'i': 3 occurences -> 6.9767441860465 %
's': 3 occurences -> 6.9767441860465 %
' ': 7 occurences -> 16.279069767442 %
Order by character:
' ': 7 occurences -> 16.279069767442 %
'#': 1 occurences -> 2.3255813953488 %
'$': 1 occurences -> 2.3255813953488 %
',': 1 occurences -> 2.3255813953488 %
'.': 1 occurences -> 2.3255813953488 %
'H': 1 occurences -> 2.3255813953488 %
'a': 2 occurences -> 4.6511627906977 %
'd': 2 occurences -> 4.6511627906977 %
'e': 1 occurences -> 2.3255813953488 %
'g': 1 occurences -> 2.3255813953488 %
'h': 1 occurences -> 2.3255813953488 %
'i': 3 occurences -> 6.9767441860465 %
'l': 3 occurences -> 6.9767441860465 %
'm': 1 occurences -> 2.3255813953488 %
'n': 2 occurences -> 4.6511627906977 %
'o': 3 occurences -> 6.9767441860465 %
'r': 3 occurences -> 6.9767441860465 %
's': 3 occurences -> 6.9767441860465 %
't': 2 occurences -> 4.6511627906977 %
'w': 1 occurences -> 2.3255813953488 %
'1': 1 occurences -> 2.3255813953488 %
'2': 1 occurences -> 2.3255813953488 %
'3': 1 occurences -> 2.3255813953488 %
PHP and HTML
PHP Webserver
PHP has a built in web-server. This means that no external server like Apache or Nginx is required to start a web-site and interlink the pages on this site.
Starting a server
The server is started with one command on the command line:
Example:
This previous command will start a web-server in the current working directory and will be accessible at the URL: http://localhost:8080.
You can pick any port, as long as it is between 1024 and 65535. By convention 8000 or 8080 are picked because of the resemblance with the official HTTP-port: 80.
As mentioned before, by default the server will start in the current working directory. If you wish the root of the site to be another directory, specify it via the -t option.
man php command on the command line.
By default the web-server will search and execute serve the index.html or index.php file in the servers root directory. (root directory = the directory where the server was started)
Making a simple page
mkdir my-website
cd my-website
echo "Hello world" > index.html
php -S localhost:8080
firefox localhost:8080
You should be greeted with Hello world…
Because the web-pages are served via a PHP server, all PHP files (ending in .php) will be interpreted by the webserver. This allows us to generate the HTML content dynamically.
Exercises
Exercise:
Create a PHP page that prints hello world when served by a web-server
Exercise:
Create a web-page that prints
- an ordered list of three your three favourite dishes (dynamically)
- a list of (three) hobbies
Exercise:
Create three web-pages that interlink to one another.
- Home
- Title
- Name
- Age
- hobbies
- Title
- list
- Favourite dishes
- Title
- list
Include / Require
PHP allows us to include one file into another. This is done via the include or require;
The difference between the two is that require will fail if the specified file can’t be included where include will merely warn about the failed inclusion.
Exercise:
Create a web-page who includes another file.
Forms
Forms can be used to send data from the web-page to the server. This data can be read and processed via PHP.
A form is composed out of a form-tag and data tags.
Form tag
The form tag has two required attributes:
- action
- method
Action
This attribute specifies the page the data should be sent to.
To send the data back to the same page, specify: # or the URL of the current page.
Method
The method defines how the data should be send to the server.
There are two main methods:
- GET
- POST
GET
GET mains appending the data as URL parameters.
Say we want to send the username and the age of a user back to the server, the URL could look like this:
http://server.com/script-to-handle-data.php?username=johnd&age=21This method has two gotchas:
- The data is sent visible to the server. Never use this method to send sensitive data back to the server.
- The number of characters allowed in an URL is limited. So large amounts of data can not be sent this way…
An advantage of this method is that the URL with the data attached can be bookmarked or shared.
POST
POST The post method comes in where GET falls short.
The data is sent in the body of the HTTP request and is this invisible and not limited by size.
This method is most often used to send data from forms back to the server
Data tags
Other special tags are used to present or request data from the user.
In order to send the data, contained in the elements, back to the server, the name attribute must be set on the elements. This name can than be used on the backend to retrieve the values entered by the user.
Input
The input tag encompasses a lot of “data types”. The type-attribute can be used to modify the behaviour of this tag.
Types:
- checkbox
- file
- number
- password
- radio
- text
The value attribute holds the default value of the element. If not defined, the element will be empty.
The radio and checkbox type don’t take a value (only) but a state, the checked replaces the value attribute.
<ul>
   <li><input type="checkbox" checked name="input-type-checkbox"></li>
   <li><input type="checkbox" name="input-type-checkbox"></li>
   <li><input type="email" value="hello.world@mail.com" name="input-type-email"></li>
   <li><input type="file" value="Hello World" name="input-type-file"></li>
   <li><input type="hidden" value="Don't show this input to the user" name="input-type-hidden"></li>
   <li><input type="number" value="42" name="input-type-number"></li>
   <li><input type="password" value="hello world" name="input-type-password"></li>
   <li><input type="radio" checked name="input-type-radio"></li>
   <li><input type="radio" name="input-type-radio"></li>
   <li><input type="submit" value="hello world" name="input-type-submit"></li>
   <li><input type="text" value="hello world" name="input-type-text"></li>
</ul>
Info: In order to send files to the server, the form attribute: enctype must be set to multipart/form-data
See later for more details on how to upload files…
Select
The select tag allows the user to choose options out of a predefined set:
<select name="name-sent-backend">
    <option value="1">Option 1</option>
    <option value="2">Option 2</option>
    <option value="3">Option 3</option>
</select>
As can be seen in the example, a select is composed out of multiple options.
The default behaviour is that only one option can be selected at once.
This can be altered via the multiple-attribute.
<select name="name-sent-backend">
    <option value="1">Option 1</option>
    <option value="2">Option 2</option>
    <option value="3">Option 3</option>
</select>

<br>

<select multiple name="name-sent-backend">
    <option value="1">Option 1</option>
    <option value="2">Option 2</option>
    <option value="3">Option 3</option>
</select>Sub-group can be created via optgroup
<select name="name-sent-backend">
   <optgroup label="numbers">
      <option value="1">Option 1</option>
      <option value="2">Option 2</option>
      <option value="3">Option 3</option>
   </optgroup>
   <optgroup label="letters">
         <option value="a">Option a</option>
         <option value="b">Option b</option>
         <option value="c">Option c</option>
   </optgroup>
</select>

<br>

<select multiple name="name-sent-backend">
   <optgroup label="numbers">
      <option value="1">Option 1</option>
      <option value="2">Option 2</option>
      <option value="3">Option 3</option>
   </optgroup>
   <optgroup label="letters">
         <option value="a">Option a</option>
         <option value="b">Option b</option>
         <option value="c">Option c</option>
   </optgroup>
</select>Textarea
To send a block of text back to the server, use a textarea.
Label
The label is not an input/data tag, but a meta-data tag.
This tag is used to add information about a data-tag. For example: label a password field as a password field.
A side benefit of using lables is that clicking a label, will automatically focus it’s corresponding data element.
PHP special data arrays
When data is sent to a PHP server, PHP will automatically populate the corresponding special array according/
Special arrays:
$_GET: Holds al the data sent via the GET method.$_POST: Holds al the data sent via the POST method.$_REQUEST: Holds al the data sent via GET and POST combined.$_FILES: Holds all the info about the uploaded files.
Example:
<form action="#" method="post">
    <input type="text" value="Hello World" name="name">
    <input type="number" value="21 World" name="age">
    <input type="submit" value="Submit" name="submit">
</form>This data can now be processed via PHP.
To test if data was submitted, the value of the submit button can be used.
In the previous example was the value: submit.
Exercises
Exercise:
Print a rainbow pyramid, each column should have it’s own color
- red
- orange
- yellow
- green
- blue
- indigo
- violet
Exercise:
Create a webpage with a login form:
- first name field
- last name field
- gender radio button
- age field
- email address
- password field
- “I want to receive updates” checkbox
Exercise:
Create a login form with a
- name field
- age field
Please validate if a user is older than 21.
Print an access granted or denied accordingly.
(Extra: Show error when a field is not filled…)
(Extra II: print how many years the user should wait before resubmitting the form…)
Exercise:
Create a parrot. Everything you submit must be echo-ed back to the screen.
Extra: append words to previous input…
Exercise:
Create a webpage that generates a triangle.
- The base of the triangle should be dynamically defined via a from submission or specified in the URL
- The character the triangle is composed of should be dynamically defined via a from submission or specified in the URL
- Extra: re-fill fields with previously entered values
Exercise:
Create a tool that validates passwords.
- Password should be entered twice and be the same.
- Password should be more than 8 characters
- (extra) Password should have at least one number and letter.
Exercise:
Create a tool that generates passwords.
- The number of characters should be defined by a form submission or in the URL.
- There should be the possibility (option) to include numbers in the generated password (via form or URL).
- You should be able to specify the number of passwords generated (via form or URL).
Exercise:
Make a web-page where you can paste and upload text and the tool should should:
- calculate and report the number of lines uploaded
- calculate and report the number of words uploaded
- calculate and report the number of characters uploaded
- Report the results in an table.
Exercise:
Make a webpage where you can upload comma separated data and convert it into a table.
- Extra: add option: make the first row headers
- Extra: throw error if number of fields is incorrect
first name, last name, gender, age
john, doe, male, 21
jane, doe, female, 18
jake, smith, male, 20
joan, d'arc, female, 33Exercise:
Create a webtool which generates random sequences. The specifics of the sequence should be configurable:
Allow the user to specify:
- Sequence header (if not defined use:
Random sequence #1) - The alfabet the sequence should be composed of (if not defined use
ATGC) - The total number of nucleotides (default:
250) - The number of nucleotides per line (default:
50) - (Extra: Add the option (specify the number of sequences to generate) to generate multi-fasta e.g. generate multiple sequences:
Random sequence #1,Random sequence #2, …)
Exercise:
Create a post comment form with fields:
- name
- title options: (Dr, Mr, Ms, Ir)
- comment box
- post anonymous checkbox.
Validate:
Name and/or email are not empty (unless post anonymous was checked)
Comment has max 500 characters
Print a red error messages if a validation failed + indicate which field failed validation, in red.
If an error occurred pre-fill the elements with the valid data
If no errors occurred,
- ( Mr. or Ms. ) (name or anonymous) posted:
- print message posted in gray.
IO
By IO we mean working with files…
Read a file
There are multiple ways to read a file:
are most important ones.
File
The file-function takes a filename as argument and returns an array where each array item corresponds to a line in the file.
File_get_contents
This function takes a filename as argument and returns a string containing the complete file contents (hence the name).
Create/Write a file
Touch
touch can be used to update the modification date of a file. If the file doesn’t exist yet, it will be created.
touch('new-file.txt'); // create new-file.txt
touch('new-file.txt'); // update modifaction timestamp of new-file.txt
Write
fwrite can be used to write contents to a file handle.
A handle can be created via fopen.
$handle = fopen('file.txt', 'w'); // 'w' indicatets open file for writing
fwrite($handle, 'Hello world'); // Write hello world to opened file
fclose($handle); // close file
This sequence of opening, writing and closing a file is quite cumbersome, therefor a shorthand is also available: file_put_contents.
Remove a file
A file can be deleted via unlink.
Rename a file
A file can be renamed via rename.
Directories
Similar functions exist for directories:
mkdir: Create directorymkdir('/path/to/dir');rmdir: Delete directoryrmdir('/path/to/dir');rename: Rename directoryrename('/path/to/dir', '/path/-to-new-dirname');
List all files in a directory:
readdir: Iterate over the files in a directory-handle$handle = opendir('/path/to/dir'); while (false !== ($file = readdir($handle))) { echo "$file\n"; }glob: List all files in a directory (as array) matching a certain pattern.$files = glob('/path/to/dir/*.php');
Upload files
File can be uploaded via a form-submission. The tag used to specify files is:
Info: In order to use the input[type=file], the form must specify the enctype-attribute:
When a form containing files is submitted the $_FILES special PHP-variable is populated with the file(s) currently uploading:
$_FILES = Array
(
    [uploaded-file] => Array
        (
            [name] => MyFile.txt             // name of the file
            [type] => text/plain             // filetype
            [tmp_name] => /tmp/php/php1h4j1o // php stores the file in a randomized tmp location
            [error] => 0                     // 0 = UPLOAD_ERR_OK --> no errors
            [size] => 123                    // the size in bytes
        )

    [file2] => Array
        (
            [name] => MyFile.jpg
            [type] => image/jpeg
            [tmp_name] => /tmp/php/php6hst32
            [error] => UPLOAD_ERR_OK
            [size] => 98174
        )
)
PHP stores the uploaded file in a temporary location. We must use the files contents or move the file to a different location. At the next request this tmp_name will be something else. So keep this in mind.
If we opt not to read the file and process it, but move the file instead, the move_uploaded_file should be used to move a file to a new destination.
This function has some additional checks builtin and is thus the recommended way to move uploaded files:
Exercises
Exercise:
Create a web-page which allows to upload a file, and print the contents of the file.
Exercise:
Create a web-page which allows to upload a file, and:
- report line-, word-a and character-count in a table
- nicely spaced cells
- lines, words, characters as rows but bold (headers)
- list the top 10 most frequent words.
- use a list but show all items aside each other (one line).
Exercise:
Create a web-page which allows to upload or paste multi-fasta data and:
- report number of sequences
- print the sequences:
- fasta header is bold
- nucleotides are monospaced, 80 characters wide
- report GC-content per sequence
Exercise:
Create a web-page which allows to upload or paste multi-fasta data and:
- print the sequences:
- fasta header is header
- (inter)link to fasta blocks
- nucleotides are monospaced, 80 characters wide
- each nucleotide should have its own color:
- A: red
- T: yellow
- G: green
- C: blue
- Display the nucleotide frequencies in a bar graph. (A: xx%, T: xx%, …)
Exercise:
Create a web-page which allows to upload or paste multi-fasta data and:
- Print the sequences:
- fasta header is header
- (inter)link to fasta blocks
- nucleotides are monospaced, 80 characters wide
- each nucleotide should have its own color the user can select from a list of options
- add an option (checkbox) indicating the nucleotides should be grouped in groups of 10. (Example: ATGCATCGAT GCATCGATGC ATCGATGCA)
- Handle invalid nucleotides in one of three ways:
- Ingore: do nothing: handle the invalid NT as a valid NT.
- Remove: remove the invalid NT from the output
- Highlight: highlight the invalid NT in the sequence.
- Display the nucleotide frequencies in a bar graph. (A: xx%, T: xx%, …)
Exercise:
Create a web-page which allows to upload a file or paste some text, and specify a list of terms.
- Print the uploaded/pasted text
- Highlight all the specified terms in the uploaded/pasted text. (for example each term starts at a new line in a textarea)
- Extra: allow the user to specify the color per term. For example:
the|red a|green an
Exercise:
In the previous exercises we created a single page application capable of receiving DNA sequences and displaying the nucleotides sequences colored on screen with an additional frequency graph.
Let’s now extend this single page application into a multi page web-app.
This app is composed out of three pages:
- Home (index.php)
- Submit a new job (submit.php)
- Visualise the sequences (color.php)
All pages also share a common navigation bar and styles.
Exercise:
Create a paste-bin web-app. The app allows the user to create a new snippet and save it (eq. write to file) via a webpage. The user can browse all snippets and view them by clicking a link…
This app is composed out of three pages:
- index: list all the uploaded snippets
- upload: a form:
- snippet name
- contents Allow the user to specify a new snippet to store. Make sure:
- no empty snippets or snippets with no name can be uploaded.
- snippet name doesn’t already exists.
- snippet contents: show the contents of a snippet
PHP functions
Sometimes you use a piece of code over and over again. This is not optimal and this code should be extracted to its own function.
A function is a block of code with a given name and can be called (executed) by this name and optionally passed arguments to change the behaviour/output of the function.
We have already used a lot of PHP builtin functions. For example: print, isset, empty, array_pop, array_push, …
As mentioned we can define our own functions.
Syntax:
Example: function without arguments
Example: function with arguments
function greet( $name ) {
    echo "Hello $name!\n";
}

greet( 'john' ); // Hello john!
greet( 'jane' ); // Hello jane!
greet(); // - ERROR -
If arguments are present in the function definition, these arguments must be passed when the function is invoked. Otherwise an error is thrown…
Arguments can however be defined with a default value, if the argument is not passed at invocation (or the argument value is NULL) the default value will be used instead.
Example: function with arguments
function greet( $name = 'anonymous' ) {
    echo "Hello $name!\n";
}

greet( 'john' ); // Hello john!
greet( 'jane' ); // Hello jane!
greet(); // Hello anonymous
Multiple arguments can be passed, separated by comma’s ,.
function greet_both( $first, $second = '' ) {

    echo "Hello $first";
    echo "Hello $second";
}

greet_both( 'john', 'jane' );
// Hello john
// Hello jane

greet_both('sam');
// Hello sam
// Hello
Return a value
The return keyword must be used to return a value from an array:
Whenever a return statement is encountered, the function will stop and return the specified value. Any code defined after the return statement will not be executed…
Example:
function fn() {

    if( true ) {

        return "was true";
    }

    echo "This will never execute because the function returned from the if statement";
}
Exercises
Exercise:
Create a function which accepts two arguments:
- name
- sentence
Output: <name> -> <sentence>
php chat.php john -> @jane: Hello
jane -> Hello john
john -> Nice weather...
jane -> Yep is is
Exercise:
Create a function which checks if a number is:
- positive
- even
- and smaller then 100
if( check_number( $nr ) ) { echo "number ($nr) passed tests"; }
else { echo "number ($nr) failed tests"; }
php validate-number.php -5number (-5) failed tests
php validate-number.php 7number (7) failed tests
php validate-number.php 22number (22) passed tests
php validate-number.php 111number (111) failed tests
Exercise:
Create a barplot: 25%, 80%, 15%.
Abstract the bars away in a function.
Exercise:
Create a function for each arithmetic operator: +, -, x, /. The function should accept an array of values and apply the operations in sequence:
Example:
plus([1,2,3, 4]); // -> 10
subtract([10,5,1]); // -> ( 10 - 5 ) - 1
divide([100, 10, 5]) // -> ( 100 / 10) / 5
multiply([7,9,8,4]) // -> 7 * 9 * 8 * 4- Extra: accept two values:
plus( 1, 2 )or array:plus([1,2])Info: Useis_arrayto check if a variable is an array…
php arithmetic-operators.php 10
4
2
2016
Exercise:
Create a function which can retrieve and validate data from an array (ex.: $_POST)
- retrieve key from array
- check if value is not empty (otherwise show error)
- check if value is not longer than 50 characters (otherwise show error)
- modify the function so a default value can be passed to the function, if the key is not found in the array, retrun this value.
php retrieve-key.php value1
default value
default value
value1
`keyx` not found in array
Exercise:
Extra: Create a function that can calculate the factorial of a number.
Try not to use loops but recursion…
php factorial.php 5120Beyond this course
As you can imagine, there is more to be learned about Web Technologies then we are able to cover during this course.
JavaScript
Modern web applications make heavy use of JavaScript to obtain high user interactivity. This course skipped the user side interactivity via JavaScript because in order to create a JavaScript application you need to know about HTML and CSS for the frontend and a serverside language to create the backend. Although JavaScript (nodejs) is used more and more as the serverside backend, PHP is still the more broadly used language…
CSS frameworks
It can become quite cumbersome to (re)create base styles from scratch. This is an issue many developers run into and for this purpose CSS frameworks where created. These frameworks ensure an identifiable style uniform across browsers. They also aid in responsive design etc…
Some popular choices:
(Twitter) Bootstrap
Build fast, responsive sites with Bootstrap
Quickly design and customize responsive mobile-first sites with Bootstrap, the world’s most popular front-end open source toolkit, featuring Sass variables and mixins, responsive grid system, extensive prebuilt components, and powerful JavaScript plugins.
Tailwind CSS
Rapidly build modern websites without ever leaving your HTML.
A utility-first CSS framework packed with classes like flex, pt-4, text-center and rotate-90 that can be composed to build any design, directly in your markup.
Bulma
Bulma: the modern CSS framework that just works.
Bulma is a free, open source framework that provides ready-to-use frontend components that you can easily combine to build responsive web interfaces.
PHP frameworks
Many PHP applications also share common functionality: user authentication, receiving, sanitizing and processing data etc.
To prevent developers of reinventing the wheel over and over again, PHP frameworks where created.
Laravel
The PHP Framework for Web Artisans
Laravel is a web application framework with expressive, elegant syntax. We’ve already laid the foundation — freeing you to create without sweating the small things.
Symfony
Symfony is a set of reusable PHP components and a PHP framework for web projects
The standard foundation on which the best PHP applications are built. Choose any of the 50 stand-alone components available for your own applications.
Speed up the creation and maintenance of your PHP web applications. End repetitive coding tasks and enjoy the power of controlling your code.